DIY Outboard Motor Stand: A Step-by-Step Guide for Safe Storage & Maintenance
Table of Contents
- DIY Outboard Motor Stand: A Step-by-Step Guide for Safe Storage & Maintenance
- Why should you build your own stand?
- What do you need before you start?
- How big should the stand be for your motor?
- Which is better for you, wood or metal?
- How do you build the base so it will not tip?
- How do you mount the transom board the right way?
- What upgrades make your stand safer and easier to use?
- How do you use the stand for repair and testing?
- What about big motors, folding designs, or wall mounts?
- How do you avoid common mistakes?
- Safety checklist you should follow every time
- Costs, time, and tools at a glance
- Extra learning if you also work with electric motors
- References
- FAQ
- Key takeaways
You have a boat motor. It is heavy. It can tip and fall. That is the problem. A fall can crack a case or smash a foot. It can hurt you too. That is the agitate part. I built a DIY outboard motor stand to fix this. You can do it too. This simple guide shows you every step. You will save money. You will get a custom fit. You will keep your motor safe in storage and during repair.
Why should you build your own stand?
I like to build with my hands. A store stand works. A homemade stand fits better. You can shape the engine stand for boat motor to your motor. You can add a shelf. You can make a rolling outboard stand that fits your shop. You can build a portable engine caddy for tight space. You can make a budget DIY outboard stand that still holds strong.
Let’s talk LSI ideas you may use as you plan. You may want DIY outboard stand plans or a full outboard motor cart construction. You may search outboard stand design ideas or simple outboard stand plans. You may need a heavy duty outboard stand for a big motor. You may build wooden outboard motor stand frames or try a metal outboard motor stand. You may need outboard motor storage stand height to fit a long shaft or a short shaft. You may even build a trailer hitch motor stand to move the motor at the ramp.
Good storage cuts repair costs. A good stand helps with maintenance. It helps with winterizing. It helps when you test run. You can add a water barrel for testing outboard. You can plan a cooling system flush stand. You can make a repair stand for outboard motor. You can set up a maintenance stand for outboard. You can even do an engine testing stand DIY in your shop.
What do you need before you start?
I always start with a clear plan. First, check your motor. Is it 2-stroke or 4-stroke? A 4-stroke is often heavier. Check horsepower and weight. Check shaft length. Decide how you will use the stand. Will it do storage only or transport too? Will you do testing with a barrel and fuel?
Now list the parts. For wood, I like lumber like 2x4s and 2x6s and plywood. Pressure treated lumber fights rot. Marine plywood holds clamps well. For metal, I use steel tube or galvanized steel angle. Aluminum can work for a light and clean build. Many folks also add small parts made with PVC. Think hooks, holders, and splash guards. Use strong fasteners. Use long screws for wood and tough bolts and washers. Lock with locking nuts.
You also need tools. Grab a tape measure, speed square, and pencil. Cut with a circular saw or miter saw. For metal, use a hacksaw or angle grinder. Make holes with a drill and the right bits. Hold parts with clamps. Tighten with a wrench and a socket. If you weld, set up a welder. Wear safety glasses, gloves, and hearing protection.
How big should the stand be for your motor?
Size matters here. The base must be wide. Keep the center of gravity low. You do not want the stand to tip. I keep the weight capacity outboard stand at least two times the motor weight. That safety first outboard stand rule will save you stress.
The transom (board/support) must fit the motor transom stand build and clamp pads. I like a transom board of 1.5 to 2 inches thick for small to mid motors. For big motors, go up to 2 to 3 inches. I often double 3/4″ marine-grade plywood to get strong engine mounting board thickness. The dimensions for various outboards change with shaft length. A short shaft sits lower. A long shaft or extra long shaft needs more height. Mark this now.
You can make the stand vertical or horizontal. A vertical outboard motor stand is common for storage. A horizontal outboard motor stand can help with some repairs, like gear case or lower unit service. Plan for a handle design for motor stand too. It helps when you push the motor around the shop.
Which is better for you, wood or metal?
Let’s compare. A wooden outboard motor stand is fast. It is easy to cut. It is low cost. Use pressure treated lumber for stand and seal it. Use varnish or paint for weatherproofing outboard stand. Wood is a good choice for budget outboard motor stand builds. It is fine for small and mid motors.
A metal outboard motor stand shines with big motors. Square steel tubing with 1/8″ wall is strong. Galvanized steel fights rust. You can also build with aluminum for outboard stand if you want to save weight. Metal needs cutting and welding. That is why many use welding plans for motor stand. It costs more. It lasts long. It is good for large outboard motor stand designs and engine hoist stand for outboard add-ons.
You can also mix both. Use a steel base and a wood transom. Bolt the transom board with carriage bolts and washers. This blend is common for a custom outboard stand in a busy shop.
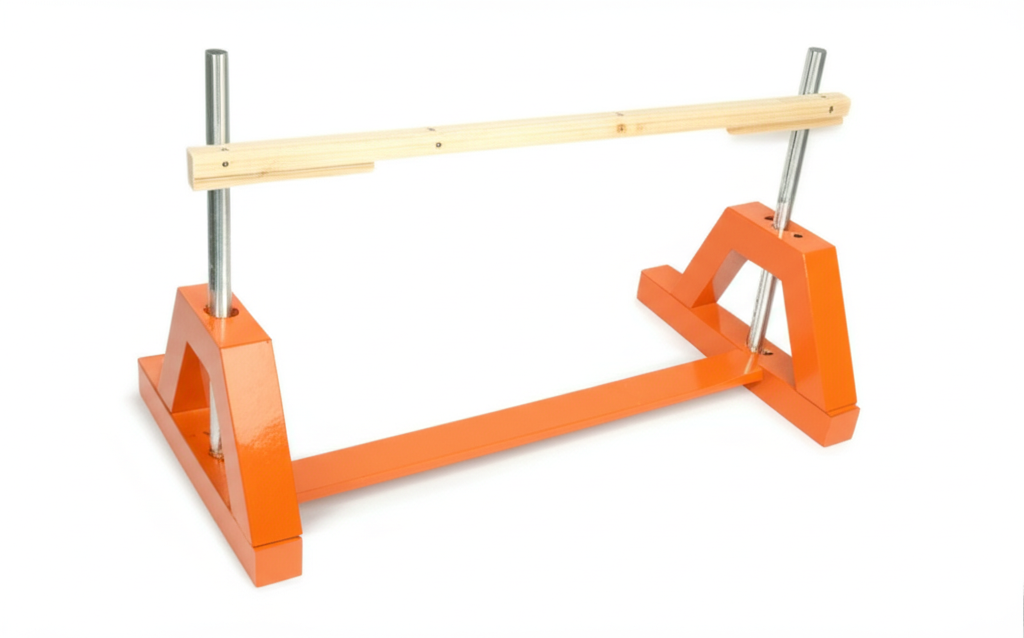
How do you build the base so it will not tip?
I start with the base. I cut the long and short members. I build a strong rectangle or an H. I add cross ties. I glue and screw. I add gussets. I want no flex. I want no rack. That keeps structural integrity outboard stand high.
I add wheels next. Pick shop casters heavy duty. Use locking swivel types so you can steer and park. Look for braking casters for outboard stand with big wheels. Read the load rating. Four casters must hold at least two times your motor weight. Bad wheels are a common mistakes building stand issue.
Add a tall back. These are the uprights. Make sure they are plumb and square. Add diagonal cross-bracing. That stops sway. That helps when you move the stand across a crack in the floor. This is how I build a motor dolly build that lasts.
How do you mount the transom board the right way?
Now set the transom board. Pick the height that fits your shaft length. Mark it. Drill for bolts for engine mounting. Add washers and lock nuts. Tighten it. If the motor is heavy, add a steel plate behind the wood. That shares load. For very big motors, add more layers of wood. If you want to swap height later, drill more holes and keep a bolt pattern ready. That lets you move from outboard stand for short shaft to outboard stand for long shaft with ease.
Make sure the board is wide enough for the motor clamps. Most need 12 to 18 inches. The clamps must sit flat. If you plan a transom saver alternative DIY for transport, add anchor points now. You can also make a outboard motor mounting bracket that bolts on if your motor has no clamps.
What upgrades make your stand safer and easier to use?
Now the fun part. Add a shelf for a fuel can. This makes a true outboard stand with fuel tank holder. Add a lower tool tray. Add tie-down points and handles. These small things make a real outboard motor workstation.
Do you store the motor outside? Sand all edges. Seal it with exterior paint or marine varnish. That is painting an outboard stand for long life. Add corner caps so it will not snag a cover. You may add recycled materials for stand like rubber mat on the base. That stops drips and slips. If you live where floors get wet, this helps a lot.
Want to move the motor across a lot? Build an outboard motor transport stand. Use large wheels. Add a front skid. Make a flip-up step. You may also add a winch or ring so you can lift with a small crane. That is nice for a engine hoist stand for outboard or when you roll near a beam hoist.
How do you use the stand for repair and testing?
Your stand can do more than hold the motor. You can build it into a outboard repair cart. That is how I like to work. I add hooks for the tiller handle and remote control (outboard) cables. I add a shelf for the fuel tank and funnel. I add a clamp for the hose so I can flush water. Now I can do a cooling system flush stand job in minutes.
Here are jobs a stand makes easy:
- Engine oil change stand for 4-strokes. Keep oil off the floor.
- Gear lube change stand for the lower unit. Catch old lube in a pan.
- Propeller repair stand work. Pull the propeller, check for line, and grease the shaft.
- Spark plug access stand and carburetor adjustment stand on older 2-strokes.
- Fuel filter replacement stand and anode replacement stand.
- Electrical connections testing stand to check power to powerhead devices.
You can also add a water barrel for testing outboard. Set the barrel next to the stand. Strap it so it will not move. Fill with water. Keep the cooling system intake deep enough. Now you can start the motor and test idle. Never leave a running motor alone. That is a strict rule.
What about big motors, folding designs, or wall mounts?
If your motor is 75 HP or more, the build changes. You should use a welded steel frame. Go with bigger tube. Use bigger wheels. Pick industrial casters. Add a cross brace and a top tie. You can also add lift rings. Then you can raise and lower with a hoist. This is best for a large outboard motor stand and heavy duty outboard stand builds.
Short on space? Make a folding design. Hinges let you fold the legs. Use pins to lock them. You can also store the motor on a wall-mounted bracket. That is handy for long term storage. A wall-mounted solution needs tough studs and heavy bolts. Never trust weak drywall.
Some folks want a outboard motor display cart or outboard display stand plans for show. You can dress up the wood and add paint and varnish. You can add a sign for brand badges like Yamaha, Mercury, Suzuki, Honda, Evinrude, or Tohatsu. Make it shine if you plan to sell or show.
How do you avoid common mistakes?
I have made mistakes so you do not have to. I once used small wheels. The stand rolled fine on smooth floors and it stopped at the first crack. Now I use big wheels with brakes. I once skipped bracing. The stand twisted. Now I always add a brace. I once used thin plywood for the transom. The clamps bit into the wood. Now I go thick and I add a backer plate.
Plan for angle of outboard stand for storage too. Many motors like to drain when tilted. Make sure the center of gravity stays inside the base. If you build a outboard engine storage cart for a very tall motor, go wider at the base. Do not guess on weight capacity. Overbuild. That is one of my best tips for a sturdy outboard stand.
If you are very tight on time, you can buy. Buying a pre-made outboard stand works if you need it now. But I still like to build. A DIY marine engine stand can fit your needs better. If you go with store-bought, make sure it has caster wheels for motor stand that lock. Make sure the handle design works for you. If you do not want to build, look for alternatives to building an outboard stand like a motor dolly or a trailer hitch motor stand.
Safety checklist you should follow every time
Use this list before you mount the motor:
- Check all fasteners for outboard stand. Tighten bolts and screws.
- Inspect caster wheels and brakes. Lock them before you work.
- Check the transom board for cracks or soft wood.
- Keep the center of gravity inside the base.
- Strap the motor as a backup. Use two straps for transport.
- Use help to lift. Do not lift a heavy motor alone.
- Never leave a running motor alone on the stand.
- Wear safety glasses and gloves when you cut or grind.
- Keep kids away from the stand when you work.
This is your safety first outboard stand routine. Make it a habit. It will save gear and skin.
Costs, time, and tools at a glance
Here’s a quick guide you can use. It shows build options, cost, time, and uses.
| Build Type | Motor Size | Frame Material | Transom Board | Wheels | Typical Cost | Time Estimate | Best For |
|---|---|---|---|---|---|---|---|
| Simple Wooden Stand | Up to 20 HP | 2×4 lumber | Double 3/4″ plywood | 4 x 3″ locking casters | $50–$100 | 2–4 hours | Storage, light maintenance |
| Reinforced Wood | 25–50 HP | 2×4 + 2×6 pressure treated lumber | 1.5″–2″ thick | 4 x 4″ locking casters | $100–$175 | 4–8 hours | Repair work, winterizing |
| Welded Steel | 75+ HP | 1.5″–2″ tube steel (1/8″ wall) | 2″–3″ with backer | 4 x 5″ industrial casters | $150–$300 | 6–12 hours | Big motor testing, shop use |
You will also need a core tool set:
- Measure and mark: tape measure, speed square, pencil
- Cut: circular saw, miter saw, jigsaw; for metal, hacksaw, angle grinder
- Drill: power drill with bits
- Assemble: wrench, socket set, clamps, welder if metal
- Finish: paint, varnish, sealers
Use good fasteners like carriage bolts and locking nuts. Use marine plywood on the transom when you can. It holds up well.
Extra learning if you also work with electric motors
Some boaters also store a trolling motor or work with shop tools. If you want to learn how motors work inside, take a look at the basics. You can explore the role of magnetic parts and how they spin. Here are helpful primers:
- Read about basic motor principles to see how force turns motion.
- Explore how stator and rotor parts work if you keep an electric motor stand in the shop.
- If you need material facts for cores, study electrical steel laminations.
- For deeper industry info, learn about motor core laminations.
This is not needed for a gas marine engine like 2-stroke engine or 4-stroke engine. It still builds your skill set. It helps if you also service chargers or shop fans on the same cart.
References
- Boat maker maintenance guides. Brands include Yamaha, Mercury, Suzuki, Honda, Evinrude, and Tohatsu.
- DIY community posts and videos. Forums include iboats and TheHullTruth. Many builders share outboard stand design ideas and common mistakes building stand.
- Safety rules from shop practice. Focus on center of gravity, weight capacity, and overbuild factors.
FAQ
Q: Can I use 2×4 wood for the whole stand?
A: Yes for small motors up to about 20 HP. Use strong joinery and a thick transom board. Upgrade wheels and braces if you go bigger.
Q: Will plywood crush under the clamps?
A: It can if thin. Use two layers of 3/4″ marine plywood or add a steel backer plate. That boosts structural integrity.
Q: Can I test-run on the stand?
A: Yes. Add a water barrel for testing outboard and clamps for the hose. Never leave it running alone. Strap the motor.
Q: Should I paint or seal the wood?
A: Yes. Painting an outboard stand or using varnish protects it. It helps with weatherproofing outboard stand and makes it easy to clean.
Q: What if I don’t have a welder?
A: Build in wood. Or have a shop weld the frame. You can still mount a wood transom on a metal frame with bolts.
Key takeaways
- Build for stability. Keep the center of gravity low and inside the base.
- Size the transom board right. Use enough engine mounting board thickness.
- Pick wheels that lock. Use braking casters for outboard stand with room to spare.
- Overbuild the weight capacity. Go 1.5x to 2x your motor weight.
- Add features you need. Shelves, fuel line routing on stand, hooks, tie-downs, a tool tray, and a outboard stand with fuel tank holder.
- Plan for service. Use the stand for engine oil change stand, gear lube change stand, propeller repair stand, spark plug access stand, and more.
- Choose wood or metal with care. Pressure treated lumber is easy. Galvanized steel or aluminum lasts and stays strong.
- Think about use. A outboard motor transport stand moves well. A outboard engine storage cart saves space. A outboard motor display cart looks great.
- Have the right tools. A drill, saw, wrench, tape measure, clamps, and safety gear matter.
- Follow the checklist. Check fasteners, casters, and transom before each use.
As I close, I’ll share the PAS again. The problem is a heavy motor and no place to hold it. That risk agitates your mind and your back. The solution is simple. Build your own DIY boat motor caddy. Make a custom outboard stand that fits your needs. Use this guide. You’ve got this.