How to Permanently Magnetize Metal with Electricity: Your Step-by-Step Guide
Have you ever dropped a tiny screw and wished your screwdriver was magnetic? It’s a small problem but so frustrating! You try to pick it up and it just won’t stick. It feels like you need a secret superpower to handle small metal parts. What if I told you that you could give your tools—and other metal objects—that exact superpower using just a few simple items? This guide will show you how to permanently magnetize metal with electricity. It’s not magic; it’s science you can do right at home!
Table of Contents
- What’s the Big Secret Behind Permanent Magnets?
- How Does Electricity Create a Magnetic Field?
- Why Do Some Metals Work and Others Don’t?
- What Stuff Will I Need for This Project?
- How Do I Build the Magnetizing Coil?
- What Are the Exact Steps to Magnetize My Metal?
- How Can I Make My Magnet Even Stronger?
- What if My Magnet Isn’t Working?
- What Cool Things Can I Do With My New Magnet?
- Final Takeaways: Your Magnetism Checklist
What’s the Big Secret Behind Permanent Magnets?
So, what is a permanent magnet anyway? It’s an object that creates its own lasting magnetic field. Unlike a temporary magnet that only works when electricity is on, a permanent magnet stays magnetic all by itself. Think about the magnets on your fridge—those are examples of permanent magnets. They hold up your drawings day and night without being plugged in.
The secret is inside the metal. All ferromagnetic materials—like iron and steel—are made of tiny little magnetic areas called magnetic domains. Imagine a huge crowd of people. If everyone is looking in a different direction, there’s no real force. That’s like a normal piece of metal. But if you get everyone to look and push in the same direction, you have a powerful force! When you use electricity to make a permanent magnet, you are telling all those magnetic domains to line up. This magnetic domain alignment is what creates a strong, lasting magnetic force. The whole explanation of magnetic domains theory is based on this simple idea of teamwork at a microscopic level, driven by the role of electron spin in magnetism.
How Does Electricity Create a Magnetic Field?
You might be wondering how electricity and magnets are connected. It’s a cool story from science history! A long time ago, a scientist figured out that an electric current flowing through a wire creates a magnetic field around it. This is the foundation of electromagnetism, a key part of electrodynamics. This is known as Oersted’s law and magnetization.
To make a strong magnet, we need to concentrate that magnetic field. The best way to do that is by wrapping a wire into a tight coil. This coil is called a solenoid. When you send electric current (DC) through the solenoid, a powerful and focused magnetic field is generated inside the coil. The role of solenoids in magnetization is super important because they act like a magnetic supercharger. We must use DC current to magnetize metal, which means Direct Current. DC flows in only one direction, like water in a river. This steady flow is what lines up the magnetic domains. Using AC (Alternating Current) would be like shaking the domains back and forth, which wouldn’t work for creating a permanent magnet. The principles of electromagnetic induction to make magnets rely on this steady field. This is related to the core concepts behind how the interaction between a stator and rotor creates motion in an electric motor.
Why Do Some Metals Work and Others Don’t?
Have you ever tried to stick a magnet to an aluminum can? It doesn’t work! That’s because only certain metals can be turned into strong magnets. The best metal for permanent magnets belongs to a group called ferromagnetic materials. This group includes iron, steel, nickel, and cobalt. The properties of ferromagnetic materials make them special.
But even within this group, there are differences. We can classify them into two types:
- Hard magnetic materials: These are tough to magnetize but once they are, they hold onto their magnetism for a very long time. Think of them as having a great “magnetic memory.” Hardened steel, Alnico, and Ferrite are great for making permanent magnets. Their ability to resist losing magnetism is called high coercivity.
- Soft magnetic materials: These are easy to magnetize but they lose their magnetism just as quickly. Soft iron is a perfect example. It’s great for making a temporary electromagnet, but not for a DIY permanent magnet. They have low retentivity, which is the ability to hold onto magnetism.
So, for this project, you want to choose a “hard” metal, like a steel screwdriver or a hardened steel nail. This ensures your magnet will last. The difference between these materials is captured in something called a magnetic hysteresis loop explanation, which is just a fancy graph showing how well a material remembers its magnetic training.
What Stuff Will I Need for This Project?
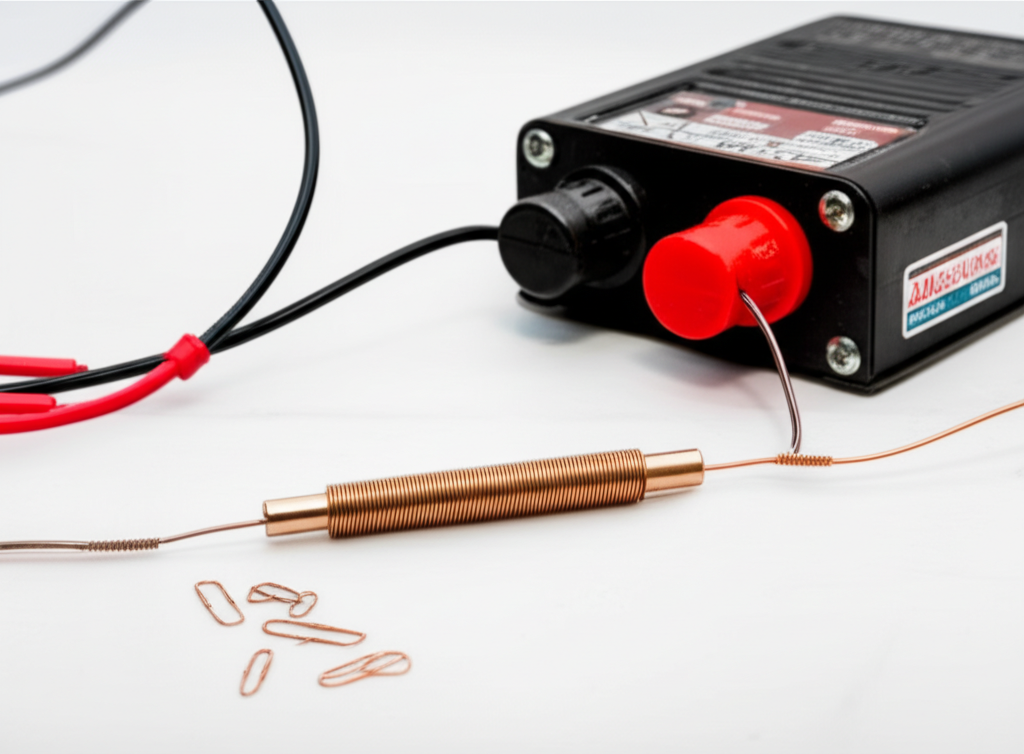
Ready to build? Gathering your materials is the first step. You don’t need a fancy lab for this simple permanent magnet project. Here’s a list of what you’ll need for your how to build a simple magnetizer setup.
| Item | Description | Why You Need It |
|---|---|---|
| Ferromagnetic Metal | A steel nail, a screwdriver, a steel rod, or a paperclip. Hardened steel works best. | This is what you will turn into a permanent magnet. |
| Insulated Copper Wire | About 3-5 feet of 18-24 AWG (American Wire Gauge) insulated wire. | To create the solenoid coil that generates the magnetic field. |
| Coil Former | A non-metal tube, like a cardboard toilet paper roll or a short piece of PVC pipe. | This gives your coil a sturdy shape. |
| DC Power Supply | A 6V or 12V battery, or a few D-cell batteries connected together. | To provide the direct current needed for magnetization. |
| Safety Gear | Safety glasses and insulated gloves. | Safety precautions for magnetizing are a must! |
| Testing Items | Paperclips, a magnetic compass, or a Gauss meter (if you have one). | To check if your magnet works and to find its poles. |
Having the right gear makes all the difference. Using the correct wire gauge for magnetizing coil and a strong enough power supply for magnetizing will ensure you create a powerful magnetizing field strength.
How Do I Build the Magnetizing Coil?
Building your solenoid is where the fun begins. This coil is the heart of your magnetizer. A well-made coil creates a strong, uniform magnetic field, which is key for strong permanent magnet creation. Here’s how to do it.
First, take your coil former, like a cardboard tube. Leave a few inches of wire hanging off one end for connections. Now, start wrapping the copper wire around the tube. The goal is to make the coil windings as tight and neat as possible, with no gaps. The number of turns in magnetizing coil is very important; the more turns you have, the stronger the magnetic field will be. Aim for at least 100-200 turns. More is better!
Once you’re done wrapping, leave a few inches of wire loose at the other end. Secure the coil with some electrical tape so it doesn’t unravel. Now, you need to strip about an inch of the insulation off both ends of the wire. This will allow you to connect it to your power source. You’ve just built a solenoid, the key tool for your electromagnet design for magnetization! This simple device is at the core of many technologies, including the components that make up a bldc stator core, which uses precisely wound coils to create motion.
What Are the Exact Steps to Magnetize My Metal?
Okay, your coil is ready and you have your piece of steel. It’s time for the main event! Follow this step-by-step guide to magnetizing metal carefully. Pay close attention to the safety rules.
This process forces the metal to reach saturation magnetization, which is the point where it can’t get any more magnetic. This ensures you have a strong and lasting magnet.
How Can I Make My Magnet Even Stronger?
Your first magnet is cool, but what if you want to make an even stronger one? You’re in luck! The physics of permanent magnetization gives us a few tricks for increasing magnetic strength permanently.
The strength of your magnetic field depends on something called Ampere-turns. This is simply the number of turns in your coil multiplied by the electric current (in Amps) flowing through it. So, to make a stronger field, you can:
- Add More Wraps: The more turns you have in your solenoid, the stronger the field. If 100 turns made a decent magnet, try 300!
- Increase the Current: Using a more powerful battery or turning up the voltage required to magnetize metal on your power supply will increase the amperage. More current means a stronger field. But be careful not to overheat your coil!
Professionals in commercial permanent magnet manufacturing methods sometimes use a technique called pulse magnetization. They use a quick, powerful blast of electricity from a capacitor to create a massive magnetic field for just a millisecond. While that’s a bit advanced for a home project, it shows that a very strong field is the key to magnetizing tough materials like Neodymium magnets. For your project, focusing on a tight coil with many turns and a solid DC power source are the best practices for permanent magnetization.
What if My Magnet Isn’t Working?
Did your experiment not work as planned? Don’t worry! It happens to everyone. Let’s look at some common problems and how to fix them.
- Problem: My metal isn’t magnetic at all.
- Agitate: It’s a real letdown when you do everything right and still, nothing happens. You feel like you wasted your time and materials.
- Solution: Check three things. First, are you using the right metal? Remember, aluminum and copper won’t work. You need a ferromagnetic material like steel. Second, did you use DC power? Using AC instead of DC will just jiggle the magnetic domains back and forth and won’t magnetize anything. Third, check your connections. Make sure the wires are securely attached to the battery.
- Problem: My magnet is very weak.
- Agitate: It can barely pick up a single paperclip. This feels like a failure, and it’s not the strong, useful tool you imagined.
- Solution: This is usually due to a weak magnetic field. You likely have weak current or few turns in your coil. Try wrapping more wire around your coil or using a stronger battery. Also, remember the most important step: removing the metal while the power is on. If you turned off the power first, you let the magnetic domains relax back to their random state.
- Problem: My coil got really hot and smelly!
- Agitate: This is scary! The smell of burning plastic means something is wrong, and you might have damaged your equipment or created a fire hazard.
- Solution: You likely used too much power for too long, causing overheating. Use the power for only 5-10 seconds at a time. If you need to do it again, let the coil cool down first. This protects the wire’s insulation.
Troubleshooting is a big part of science. By figuring out what went wrong, you learn even more about the principles of electromagnetism.
What Cool Things Can I Do With My New Magnet?
Congratulations! You’ve harnessed the power of electromagnetism principles for permanent magnets and made something amazing. Now, what can you do with it? The applications of permanent magnets you make at home are endless.
You can start by magnetizing all your screwdrivers. This makes working with small screws so much easier. No more dropping them! You could also make a small magnetic holder for paperclips on your desk or magnetize a steel bar to find dropped needles or pins in a carpet. This is one of the big benefits of permanent magnets—they are incredibly useful.
This project is also a fantastic demonstration for a science fair. You can explain the difference between electromagnet and permanent magnet and show how you made your own. You could even build a simple electric motor, which uses these very principles. The amazing thing is that the same science you used to magnetize a nail is used in giant industrial machines, like in the creation of precisely engineered transformer lamination core components.
Final Takeaways: Your Magnetism Checklist
You’ve learned how to convert electromagnet to permanent magnet using simple, powerful science. It’s an amazing feeling to create a magnetic field and make a permanent change to a piece of metal.
Here are the most important things to remember:
- Use the Right Stuff: You need a ferromagnetic metal (like steel) and a DC power source (like a battery).
- Build a Good Coil: A tight coil (solenoid) with lots of turns makes a strong magnetic field.
- Power and Pull: The most critical step is to slowly remove the metal from the coil while the power is still on.
- More is More: To get a stronger magnet, use more wire wraps or more electrical current.
- Safety First: Always wear safety glasses and be careful with electricity. Never leave your coil connected for too long.
Now you know the secrets of how to make a permanent magnet with electricity. Go ahead and experiment safely. The world of magnetism is waiting for you