How to Shim a Starter Motor: The Ultimate DIY Guide to Stop Grinding and Improve Engagement
Table of Contents
- Introduction: The Day a Grinding Starter Taught Me About Shims
- What a Starter Motor Shim Does and Why It Matters
- Clear Signs Your Starter Motor Needs Shimming
- Why Starters Need Shims in the First Place
- Tools and Materials I Keep on Hand
- Safety First: How I Prep the Vehicle and Protect Myself
- Step-by-Step: How I Shim a Starter Motor
- 1) Remove the starter motor
- 2) Inspect the flywheel and starter pinion
- 3) Measure pinion-to-ring gear clearance
- 4) Choose the right shims and understand how they move the starter
- 5) Install the shims and remount the starter
- 6) Test and fine-tune the engagement
- Common Mistakes I See and How to Fix Them
- Brand and Setup Notes: GM, Chevy, Ford, Aftermarket, Automatic vs Manual
- Electrical Checks That Save You Headaches
- When I Stop and Call a Pro
- My Quick Reference: Symptoms, Causes, and What I Do
- Final Thoughts: Smooth Starts, Quiet Engagement, and Long-Term Reliability
Introduction: The Day a Grinding Starter Taught Me About Shims
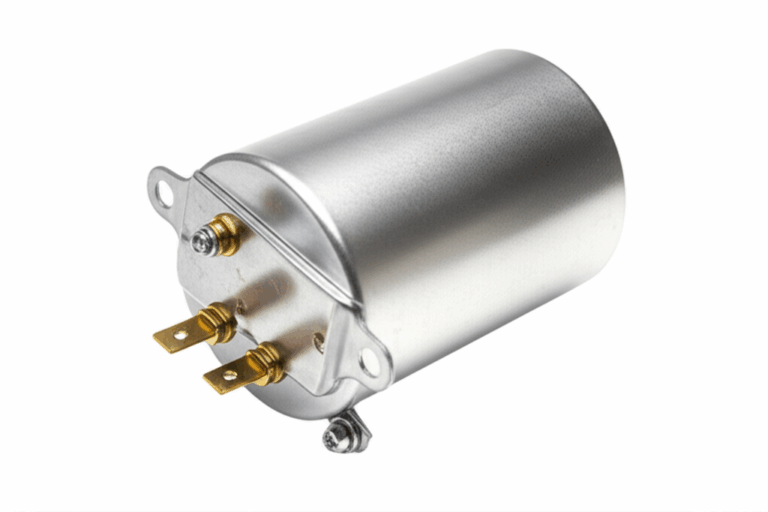
I still remember the first time a starter motor taught me humility. I had just finished installing a remanufactured unit on a small block Chevy. I hit the key and winced at a sharp grinding noise that made my stomach drop. That sound can wake the neighbors and chip a flywheel ring gear at the same time. I knew two things right away. The starter motor engagement was off and I needed to shim the starter.
That job sent me down the rabbit hole of how to adjust starter motor engagement correctly. Since then I’ve shimmed more starters than I can count. GM classics. Swapped engines with aftermarket gear reduction starters. The occasional Ford that needed a tweak after a transmission swap. The process stays the same. Diagnose the noise, measure the pinion-to-ring gear clearance, select proper starter shims, and test until the mesh sounds clean.
In this guide I’ll walk you through my exact approach. I’ll share what I look for, the tools I trust, and the little tricks that save time. If you stick with me you’ll learn how to stop that grinding, preserve your flywheel ring gear, and get consistent starts.
What a Starter Motor Shim Does and Why It Matters
A starter motor shim is a thin spacer that fits between the starter mount and the engine block or bellhousing. It changes the position of the starter’s pinion gear (often called the Bendix gear) relative to the flywheel or flexplate’s ring gear. That small change matters. Too little clearance and you get binding or a high-pitched whine. Too much clearance and you get grinding or partial engagement.
Here’s the big picture:
- The solenoid pushes the pinion gear outward to mesh with the ring gear.
- The electric motor spins and cranks the engine.
- Proper pinion-to-ring gear clearance lets the teeth mesh fully without binding.
- Shims fine-tune that distance.
I aim for a clearance in the 0.020 to 0.060 inch range with 0.030 to 0.045 inch as a sweet spot. Always check your vehicle or starter manufacturer’s specs if you can. That spec ensures proper starter motor engagement depth and minimal wear.
Clear Signs Your Starter Motor Needs Shimming
I don’t guess. I listen and look. Here are the symptoms I use to decide if I need to shim a starter:
- Loud grinding at startup
- Teeth aren’t meshing deep enough. The starter motor gear skims the tops of the ring gear teeth.
- Whining, screeching, or binding
- The pinion dives too deep into the ring gear and binds under load.
- A clunk without full rotation
- The solenoid clicks and pushes the pinion out but it does not fully engage. Sometimes you get partial rotation then a stop.
- Visible gear wear
- “Shark-toothed” or chipped ring gear teeth. Shiny spots on the starter pinion gear teeth.
- Intermittent starting with noise
- Starts fine sometimes then grinds others. That points to marginal clearance or alignment issues.
- Starter motor drag or slow crank with noise
- Poor alignment can load the motor and drag down performance.
Why Starters Need Shims in the First Place
I used to think shims were a band-aid. They’re not. They compensate for variation.
- Manufacturing tolerances
Engine blocks, bellhousings, and even remanufactured or aftermarket starters have small dimensional differences. Stack a few together and you can end up with poor alignment.
- Engine or transmission swaps
Flexplate changes. Bellhousing differences. Swapping manual to automatic or vice versa. These changes can tilt the equation.
- Aftermarket gear reduction starters
Great performance but sometimes a different nose cone or mount lands the pinion in a slightly different spot.
- Heat and wear
Long term heat, small deformations at the starter mount, or previous grinding can make a once-perfect setup noisy.
The fix is simple. Adjust position with the correct shim thickness. That’s how I prevent premature starter pinion wear and ring gear damage.
Tools and Materials I Keep on Hand
If you want to DIY this job smoothly you’ll want these:
- Starter shim kit with assorted thicknesses
- Full shims and half shims. More on how I use each in a minute.
- Feeler gauges, 0.020 to 0.060 inch range
- I also keep a 0.030 inch wire or paperclip for a quick check.
- Socket wrench set and extensions
- Torque wrench
- I tighten to the manufacturer’s torque specs. Check your service manual.
- Floor jack and jack stands or a lift
- Safety glasses and work gloves
- Battery terminal wrench
- Wire brush for cleaning connections and mounting surfaces
- Multimeter if I suspect electrical issues like voltage drop
- Remote start switch for controlled engagement during measurement
Safety First: How I Prep the Vehicle and Protect Myself
A starter sits low and close to the bellhousing which means I’m under the vehicle with heavy tools and electrical power nearby. I follow a few non-negotiables:
- Disconnect the battery before any work
- Negative terminal first. That kills the circuit and protects you from accidental shorts.
- Lift the vehicle safely
- Use a level surface, set the parking brake, chock wheels, and use jack stands. Never rely on a jack alone.
- Let the engine cool
- Starters sit near exhaust and bellhousing. Hot metal burns fast.
- Wear safety glasses
- Rust and grit fall easily when you crack bolts loose.
- Keep wiring clear of the exhaust and moving parts during testing
- I always double check routing when I reinstall.
Step-by-Step: How I Shim a Starter Motor
This is the routine that has given me the best results for years. I’ll break it into precise steps so you can follow along.
1) Remove the starter motor
- Disconnect wiring
- The main battery cable and the solenoid wire. Label them if you like.
- Support the starter as you unbolt it
- I crack both mounting bolts loose, support the starter with my hand, then remove bolts fully. Starters are heavy and awkward so keep your face out of the drop zone.
- Note existing shims
- Some engines already have shims in place. I mark how many and where they sit. That gives me a starting point. Half shims under one bolt vs full shims under the whole flange matter later.
2) Inspect the flywheel and starter pinion
Before I even measure, I look for damage.
- Flywheel ring gear
- Rotate the engine by hand if needed and check the teeth. Look for chips, heavy wear, or uneven tooth profiles.
- Starter pinion gear
- Check for worn teeth, burrs, or sharp edges. Replace a worn starter drive gear if needed. Shimming cannot save a chewed pinion.
- Clean the mounting surfaces
- Use a wire brush on the block/bellhousing and the starter flange. Dirt and paint stack up like accidental shims which throws off your measurement.
3) Measure pinion-to-ring gear clearance
Now I measure. There are two ways I do it. Use what fits your setup and comfort level.
Method A: Bench method
- With the starter out, I can bench test the solenoid to extend the pinion gear. I use a battery or a jump box. Keep your hands clear.
- Measure the clearance once I line it up to the ring gear position. This method can be awkward if the starter sits at an angle in the vehicle so I use it when access is tight.
Method B: In-vehicle method
- I loosely mount the starter without shims so the pinion sits in position.
- I use a remote start switch or bump the key just enough to extend the pinion into the ring gear. I do not crank the engine. I immediately disconnect the battery again after the pinion extends.
- With the pinion extended I measure the gap between the pinion tooth and the ring gear tooth valley using a feeler gauge.
- Ideal gap
- I aim for 0.020 to 0.060 inches. Many techs like 0.030 to 0.045 inches. Check your service specs if you have them.
Quick checks that help:
- Paperclip trick
- A standard paperclip wire is around 0.030 inch thick. If it fits snug in the gap you’re in the ballpark.
- Grease pattern
- I smear a thin film of grease on the pinion then extend it into the ring gear and pull it back. The contact footprint tells me how deep and wide the mesh sits. Narrow or shallow marks signal poor engagement.
4) Choose the right shims and understand how they move the starter
Shims move the starter away from or closer to the flywheel. The direction matters.
- Add shims to move the starter away from the flywheel
- I add a shim if I hear binding or whining. That gives more clearance.
- Remove shims to move the starter closer to the flywheel
- I remove a shim if I hear grinding at the teeth tips. That reduces the gap.
Full shims vs half shims:
- Full shims
- These cover both mounting bolts. I use them for large, even changes in clearance.
- Half shims
- These fit under one mounting bolt. I use half shims to tilt the starter slightly which can help alignment if one side bites harder or if the ring gear sits slightly out. Many gear reduction starters respond well to a single half shim under the outboard bolt to tune the mesh.
Thickness matters. Starter shim kits usually include several sizes. I sneak up on the right clearance rather than jumping to a thick shim. It saves time in the end.
5) Install the shims and remount the starter
- Place the shims
- I set the selected shim(s) between the starter and the mounting surface. Keep them flat and aligned with the bolt holes.
- Bolt the starter up
- Start the bolts by hand to avoid cross-threading. Snug them evenly then torque to the manufacturer’s spec. Do not over-tighten. You can crack a nose cone or distort the mount.
- Reconnect wiring
- Clean electrical connections with a wire brush if they look dirty or corroded. Tighten the main battery cable nut and the solenoid wire. Make sure the main cable is routed away from the exhaust.
6) Test and fine-tune the engagement
- Reconnect the battery
- Positive first then negative. That way you reduce the chance of a short to ground.
- Start the engine several times
- Listen for:
- Clean, quick engagement
- No grinding, whining, or clunking
- No drag or slow crank caused by binding
- If I hear anything off I repeat the measurement and adjust shim thickness by one step. I make small changes and test again. Two or three test cycles usually nail it.
Common Mistakes I See and How to Fix Them
I’ve made a few of these in my early days so I watch for them now.
- Guessing without measuring
- Don’t throw in a random shim. Measure the clearance with a feeler gauge or use the 0.030 inch trick. Your ears help but measurements lock it in.
- Skipping surface prep
- Dirt, old paint, and corrosion act like accidental shims. Clean both sides of the mount.
- Ignoring damaged teeth
- If the flywheel ring gear shows heavy chipping, shimming won’t fix the root problem. Replace the worn components first.
- Tightening bolts without a torque wrench
- Hand tight often turns into too tight or too loose. Either can cause alignment drift. Use a torque wrench and the factory spec.
- Confusing symptoms
- A weak battery, bad ground, or poor cable can mimic starter noise. I always check voltage drop if engagement sounds “off” with no visible gear issues.
Brand and Setup Notes: GM, Chevy, Ford, Aftermarket, Automatic vs Manual
Different setups come with different quirks. Here’s what I’ve learned.
- GM and classic Chevy engines
- Shimming is common on older GM platforms including small block Chevy starters. Manufacturing tolerances and decades of rebuilds put shimming on the to-do list. I expect to shim these.
- Ford
- Many Ford OEM starters don’t commonly need shims in stock form. Add an aftermarket high torque starter, a different bellhousing, or a swap and you might need thin shims or spacing washers. I follow the same measure-adjust-test routine.
- Automatic vs manual
- Automatics use a flexplate. Manuals use a flywheel. The ring gear sits differently on each and aftermarket parts can change dimensions slightly. If I swap transmissions I always recheck starter motor gear clearance.
- Gear reduction starters
- These draw less current and crank strong but their nose cones and mounting pads can vary. I keep half shims handy. Tilt adjustments can clean up the mesh.
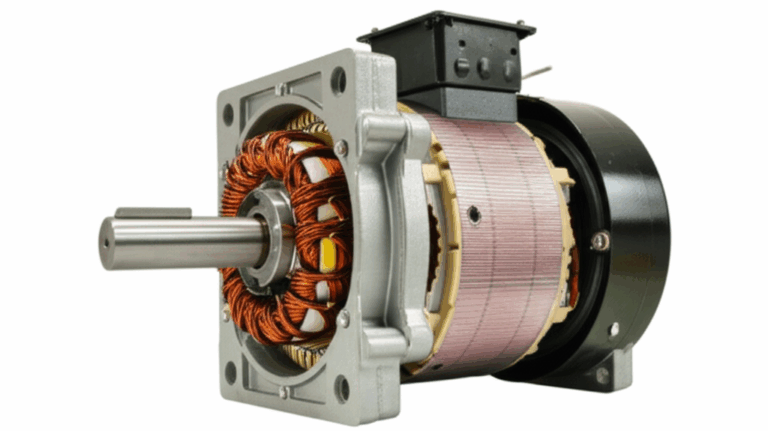
A quick detour for the curious: A starter is a compact DC motor with a pinion and solenoid drive. Inside you’ll find stator and rotor assemblies that use laminated steel to reduce eddy currents and losses. If you want a deeper dive into what those parts do inside any electric motor you can learn more about stator core lamination, rotor core lamination, and why manufacturers rely on electrical steel laminations. For a friendly refresher on how motors make motion, this overview of the motor principle ties the concepts together nicely.
Electrical Checks That Save You Headaches
Not every nasty noise is a shim problem. Electrical issues can make a good starter sound bad. I run a few quick checks:
- Battery health
- A weak battery can cause slow pinion throw or half-hearted cranking. Load test if you suspect it.
- Voltage drop test
- I measure voltage drop on the positive cable from battery to starter while cranking. I repeat on the ground path from starter case to battery negative. Excessive drop points to corroded connections or failing cables.
- Grounds
- The starter case must sit on a clean, grounded surface. I make sure the engine ground strap is intact and tight.
- Solenoid clicking
- A single click with no crank points to a low battery, sticky solenoid, poor ground, or a failing starter motor. Solve those before shimming.
- Wiring routing
- Keep the main battery cable and solenoid wire away from the exhaust. Heat soak can weaken cranking and cook insulation.
When I Stop and Call a Pro
I enjoy DIY work but I also know my limits. I call a pro when:
- The starter still grinds after careful measurement and shimming
- This can point to a bent flexplate or flywheel, a misaligned bellhousing, or internal starter damage.
- The flywheel or flexplate shows major damage
- Replacing a flywheel or flexplate means separating the transmission from the engine. That is a big job without the right tools and space.
- Access is brutal on the specific vehicle
- Some cars pack the starter in a tight spot under subframes or exhaust manifolds. If I can’t reach it safely I hand it off.
- I suspect internal starter failure
- Burned brushes, worn armature, broken overrunning clutch. A rebuild or replacement makes more sense than endless shimming.
My Quick Reference: Symptoms, Causes, and What I Do
- Grinding at startup
- Cause: Too much clearance. The pinion barely kisses the ring gear.
- Fix: Remove shim thickness. Re-measure to 0.020 to 0.060 inch target.
- Whining or binding during crank
- Cause: Too little clearance. The pinion jams into the ring gear.
- Fix: Add shim thickness. Re-measure and test.
- Clunk then no crank or partial crank
- Cause: Partial engagement, misalignment, or weak solenoid throw.
- Fix: Check clearance, battery, and wiring. Clean mount and ground.
- Intermittent noise
- Cause: Marginal clearance or hot-soak induced drag.
- Fix: Fine-tune shims and verify electrical health and cable routing.
FAQs I Answer a Lot (Based on Real Garage Conversations)
- How do I know how much to shim a starter?
- Measure the gap between the pinion tooth and the ring gear tooth valley with a feeler gauge while the pinion is extended. Target 0.020 to 0.060 inches with 0.030 to 0.045 inches common.
- Do all cars need starter shims?
- No. Many don’t. It depends on the platform and the parts. GM platforms use them often especially with remanufactured or aftermarket starters. Some Ford and import setups rarely need shims unless parts have changed.
- What’s the difference between full and half shims?
- Full shims adjust the whole starter outward or inward evenly. Half shims sit under one bolt to slightly change angle and mesh. I use full shims first then fine-tune with half shims if needed.
- Can I fix a damaged flywheel with shims?
- No. Shims correct position. Damaged teeth need parts replaced.
- Can a bad battery cause grinding sounds?
- Indirectly yes. A weak battery can throw the pinion weakly which leads to poor engagement and noise. Always verify battery health and clean connections.
Costs and Payoff From My Experience
Shims cost a few bucks. Starter shim kits usually fall in the $5 to $25 range. Compare that to replacing a flywheel or flexplate which can cost a few hundred dollars in parts and much more in labor because the transmission has to come out. That math speaks for itself.
DIY shimming success rates are high when you measure carefully and follow the process. In my experience most grinding complaints come down to incorrect pinion-to-ring gear clearance. If the teeth look healthy and you set the gap in spec the noise usually disappears.
Extra Tips That Make the Job Easier
- Mark the starter bolts
- A paint pen mark helps you keep track of torque and any small changes between tests.
- Photograph the wiring before removal
- You’ll never mix up which ring terminal goes where if you snap a photo first.
- Keep spare hardware
- I keep a couple of correct-length starter bolts and lock washers on hand. Rounded or stretched bolts ruin alignment and torque accuracy.
- Use your ears and a mechanic’s stethoscope carefully
- Listen up close during test cranks. Different noises tell different stories. Grinding at the moment of engagement points to clearance. Whining during cranking signals binding depth.
- Don’t neglect heat shields
- Starters sit next to exhaust on many vehicles. A missing heat shield can cause hot-soak issues that masquerade as engagement problems.
Understanding the Starter Motor Parts You’re Working With
If you like to know what’s happening inside:
- Solenoid
- An electromagnetic switch that pushes the pinion gear into the ring gear and connects battery power to the starter motor.
- Pinion gear (Bendix gear)
- The gear that engages the ring gear. The overrunning clutch lets the engine spin faster than the starter once the engine fires which prevents back-driving the motor.
- Armature and field windings or permanent magnets
- The heart of the motor. This is where all that current turns into torque to crank the engine.
- Brushes and commutator
- Wear items in many starters. If these fail you can get clicking, slow cranking, or no crank even if the shimming is perfect.
- Drive end housing and starter mount
- These parts align the motor. Clean surfaces and straight hardware matter as much as the shim.
If you ever rebuild a starter or choose a high-torque gear reduction unit you’ll see how core laminations and steel choices affect performance and heat. If that piques your curiosity, the deep dive on stator core lamination, rotor core lamination, and electrical steel laminations can give you the material science angle. For a conceptual refresher, the motor principle explains why any motor spins when current flows through a magnetic field.
Troubleshooting If the Noise Persists After Shimming
If it still sounds wrong after careful measurements, I run this checklist:
- Re-confirm clearance
- Verify the feeler gauge reading with the pinion extended. Double check that you measured tooth-to-valley.
- Inspect teeth again
- A small chip you missed before can start the noise. Rotate the engine to see more of the ring gear teeth.
- Verify torque and shim placement
- A crooked shim or uneven torque can tilt the starter. Loosen, reseat, and retorque.
- Check for bellhousing alignment issues
- If the transmission was recently removed or swapped, the bellhousing may not sit perfectly. That throws the ring gear out of true relative to the starter.
- Confirm electrical health
- Measure voltage drop and load-test the battery. Weak throws cause partial engagement and noise.
- Consider starter quality
- Some remanufactured starters are out of spec at the nose cone or pinion depth. Swapping to a higher quality unit can solve a stubborn noise that measurement alone cannot fix.
Brand-Specific Pointers I’ve Learned
- GM/Chevy small block and big block
- Keep both full and half shims ready. Many old-school Chevys respond well to a single half shim tweak after a thin full shim sets the baseline gap.
- Ford
- If you install an aftermarket high torque unit check the manufacturer’s shimming instructions. Some provide specific washers or spacers. Measure clearance the same way with a feeler gauge.
- Dodge/Chrysler and others
- OEM setups often land correctly without shims. Swaps and remanufactured parts change that equation. If you hear noise, measure first and shim as needed.
Starter Motor Maintenance Habits That Help
- Clean and tight electrical connections
- The best starter in the world drags if it cannot get current. I brush and tighten the battery posts, grounds, and starter lugs.
- Heat management
- Use a heat shield or wrap if your header or exhaust sits close. Heat soak causes hot-start struggles that sound like engagement or drag issues.
- Inspect after major work
- After a clutch job, flywheel change, or transmission swap I always re-check starter engagement. New parts can shift clearances.
Final Thoughts: Smooth Starts, Quiet Engagement, and Long-Term Reliability
Shimming a starter motor isn’t black magic. It’s a precise adjustment that you can do at home with a feeler gauge, a starter shim kit, and a methodical approach. The first time I chased a grinding starter I felt lost. Now I measure first, choose shims thoughtfully, then test and listen. That simple loop solves most engagement problems in one or two passes.
Here’s the bottom line:
- Measure the pinion-to-ring gear clearance with the pinion extended.
- Target 0.020 to 0.060 inches unless your manufacturer says otherwise.
- Use full shims for big moves and half shims for fine tuning.
- Clean mounts, torque correctly, and verify electrical health.
- Test multiple starts before calling it done.
Do that and you’ll stop the grinding, keep your ring gear healthy, and enjoy a quiet reliable start every time.