How to Test a Three-Phase Electric Motor: A Comprehensive Guide for Diagnostics & Troubleshooting
Table of Contents
- Introduction
- Who should use this guide?
- What safety steps come first?
- How do I start with a visual and mechanical check?
- What tools do I need for basic electrical tests?
- How do I test winding resistance the right way?
- How do I run an insulation resistance test with a megger?
- How do I check continuity, phase balance, and phase rotation?
- What advanced tests help me catch hidden faults?
- How do I read results and fix common problems?
- How do I build a smart maintenance plan?
- What standards and brands should I trust?
- When do I repair and when do I replace?
- How do better laminations boost motor health and testing results?
- Mini case study: from downtime to uptime
- FAQ
- Key takeaways
- References
You want your motor to run strong, run cool, and run long. This guide shows you how to test a three-phase electric motor step by step. You will learn simple checks, smart tools, and pro tips. Read this if you want less downtime, more uptime, and peace of mind.
Who should use this guide?
I wrote this guide for techs, maintenance pros, plant managers, and curious students. Maybe your motor will not start. Maybe it runs hot. Maybe it trips a breaker. You want answers now. You want a clear path to find the root cause. You want to know when to repair and when to replace.
Problem: Motors fail from both electrical and mechanical faults. Agitate: When they fail you lose money fast. Some plants lose $10,000 to $20,000 per hour. Solution: Use the tests in this guide. Pick the right tool. Measure the right thing. Read the results with confidence. Stop guessing. Start knowing.
What safety steps come first?
Before you touch a lead you must stay safe. You only get one body. Treat power with respect.
- Lockout/tagout (LOTO). Follow the exact LOTO procedure at your site. Put on your tag. Test for dead. Verify the zero energy state.
- Wear personal protective equipment (PPE). Use gloves, eye protection, and arc-rated gear that match the task.
- Discharge stored energy. Some motors hold charge in the windings. Some drives hold energy in DC bus caps.
- Confirm safe work area. Keep tools dry. Keep the floor clean. Check the motor control center (MCC) for hazards.
Tip: Use electrical safety motor testing best practices every time. Never skip them.
How do I start with a visual and mechanical check?
Begin with your eyes and ears. A short walk can prevent a long repair.
- External casing and connections. Look for corrosion, damage, burns, or loose terminals in the terminal box. Do a terminal box inspection. Check conduit entries and do conduit connection checks.
- Fan and cooling fins. Clean blockages. Replace a broken fan. Good cooling prevents overheating and motor frame temperature spikes.
- Bearings. Spin the shaft by hand. Listen for bearing failure signs like grinding or roughness. Check shaft seals and lubrication issues.
- Shaft play. Check axial and radial movement. Excess play points to wear or rotor eccentricity.
- Coupling and alignment. Inspect coupling alignment and perform mechanical integrity checks. Fix soft foot if needed.
- Nameplate data. Do nameplate data interpretation. Note Volts, Amps, Hertz, rated kW or HP, insulation class, and service factor.
If you hear odd sounds run a quick noise analysis. A simple stethoscope or a smartphone app can give clues.
What tools do I need for basic electrical tests?
Set up your test kit. You do not need every tool on day one. Start with the basics then add advanced tools as your program grows.
- Multimeter for voltage and ohms
- Megohmmeter (Megger) as an insulation tester
- Clamp meter for current
- Digital low resistance ohmmeter (DLRO) for low ohm readings
- Thermal imager for hot spots
- Vibration analyzer if you can get one
- Surge tester and hipot tester for deeper checks
Common brands include Fluke and AEMC for meters. Bearing makers like SKF publish useful guides. Big motor makers like ABB and Siemens share strong technical tips.
How do I test winding resistance the right way?
You test winding resistance to find open circuits, shorts, and imbalances. Use a DLRO or a high-precision multimeter that reads low ohms well.
- Purpose: Catch an open circuit winding, a short circuit winding, or winding resistance imbalance between phases.
- Equipment: Digital Low Resistance Ohmmeter (DLRO) or a four-wire meter to reduce lead error.
- Procedure:
- Interpreting results: Readings should match within a few percent. Large deviations point to a stator winding fault. Use a DC resistance test for stable readings. Some techs also run an AC resistance test to compare.
This test works best after the motor cools to room temp. Heat changes resistance.
How do I run an insulation resistance test with a megger?
The insulation resistance test checks the integrity of insulation to ground and between windings. This test prevents shocks and trips.
- Purpose: Find moisture, dirt, or insulation breakdown before it becomes a failure.
- Equipment: Megohmmeter (Megger) as an insulation tester.
- Procedure:
- Interpreting results:
- New motors often show very high megohms.
- Low readings point to moisture or damage.
- PI and DAR help you judge insulation tester usage results over time.
You can also run high potential testing or a hipot test for motors with care. Follow motor testing standards and your site rules.
How do I check continuity, phase balance, and phase rotation?
A quick continuity test tells you if a winding path is intact. A phase balance test checks the health of your supply and your load.
- Continuity test:
- Purpose: Verify a complete path in each winding.
- Equipment: Multimeter on ohms.
- Procedure: Check each winding and compare readings. An open path means a break.
- Phase balance test:
- Purpose: Detect voltage imbalance and current imbalance that raise temperature and cut life.
- Equipment: Multimeter and clamp meter.
- Procedure: Measure voltage at L1–L2, L2–L3, L3–L1 in Volts. Measure current on each phase in Amps with the motor running when safe.
- Interpreting results: Keep voltage imbalance under 1 percent per NEMA standards for motors. Even 3.5 percent voltage imbalance can raise winding temperatures about 25 percent which hurts life.
- Phase rotation test:
- Purpose: Confirm correct rotation before startup.
- Equipment: Phase rotation meter or a test function in some meters.
- Procedure: Check rotation at the motor control center (MCC) or the motor terminals.
Also check voltage drop under load. A voltage drop test finds weak cables and loose lugs.
What advanced tests help me catch hidden faults?
When you need deeper insight these tests shine. They are great for predictive maintenance motor programs and on-line motor testing.
- Motor Current Signature Analysis (MCSA):
- Purpose: Detect rotor bar cracks, air gap issues, bearing faults, alignment problems, and looseness.
- Equipment: MCSA analyzer.
- Benefits: Non-invasive and on-line. It often finds faults months early.
- Vibration analysis:
- Purpose: Spot unbalance, misalignment, looseness, and bearing failure.
- Equipment: Vibration analyzer.
- Interpretation: Read the frequency spectrum. Look for patterns tied to running speed and bearing fault frequencies.
- Thermal imaging:
- Purpose: Find hot spots, overheating motor causes, bad connections, and blocked cooling.
- Equipment: Thermal imager (infrared camera).
- Benefits: Fast and visual. Scan the frame, terminals, and bearings.
- Surge comparison test:
- Purpose: Catch inter-turn short and weak insulation.
- Equipment: Surge tester.
- Procedure: Apply high-frequency pulses and compare waveforms between coils.
- Partial discharge detection:
- Purpose: Find early insulation stress on high voltage machines.
- Tools: PD detectors or specialized sensors.
- Other helpful tests:
- Capacitance test and inductance test for winding health.
- Flux testing motor and magnetic balance test for magnetic issues.
- Core loss testing to check core steel.
- Shaft current testing to prevent fluting on bearings.
- End winding vibration checks for loose end turns.
For DC armatures a growler test for armatures helps find shorts. Some shops still use it.
How do I read results and fix common problems?
Use a clear process. Measure. Compare. Decide. Then act. Here is a quick diagnostic flow chart in table form you can follow.
| Test | Purpose | Good Result | Bad Result | Likely Issue | Next Step |
|---|---|---|---|---|---|
| Winding resistance test | Find open/short/imbalance | 3 readings close | One reading off | Open or short | Inspect windings, consider repair |
| Insulation resistance test | Check insulation to ground | High megohms, strong PI | Low megohms, low PI/DAR | Moisture or insulation damage | Dry, clean, or rewind |
| Continuity test | Verify path | Beeps or low ohms | Open circuit | Broken coil or lead | Repair shop motor testing |
| Phase balance test | Check supply and load | Under 1% imbalance | Over 2–3% | Utility or load issue | Fix supply, balance loads |
| Thermal imaging | Find hot spots | Even temp | Hot terminals/bearings | Loose lugs, bad bearing | Tighten, lube, replace |
| Vibration analysis | Find mechanical faults | Low baseline | Peaks at known bands | Unbalance or misalignment | Align, balance, replace bearings |
| MCSA | Catch early faults | Clean spectrum | Fault signatures | Rotor bars or bearings | Plan repair, trend data |
| Surge test | Find inter-turn short | Matched traces | Trace mismatch | Weak insulation | Rewind or replace |
Now match common scenarios to root causes.
- Low insulation resistance: Moisture, contamination, age, or partial discharge damage. Dry the motor. Bake it if needed. Clean it. Retest PI and DAR. Consider voltage surge testing or a rewind if values stay low.
- Winding resistance imbalance: Inter-turn short or poor connection. Look at coils and leads. Plan a rewind or replacement.
- High vibration: Unbalance, misalignment, bearing failure, or rotor eccentricity. Balance the rotor. Align the coupling. Replace bearings. Check for soft foot correction.
- Overheating: Too much load, single phasing, blocked cooling, voltage imbalance, or bad bearings. Fix airflow. Balance voltage. Reduce load. Check cooling fan inspection.
- Phase imbalance: Utility voltage issues, bad connections, or a motor protection relay tripping. Test at the MCC. Check upstream gear. Verify power quality analysis.
How do I build a smart maintenance plan?
You do not need a giant budget to start. You need a plan and discipline.
- Baseline data collection: Gather baseline motor data on a healthy motor. Record load current measurement, no-load current test, startup current analysis, locked rotor current, vibration levels, and motor frame temperature.
- Regular testing intervals: Set preventive maintenance checks by criticality. Do off-line motor testing during shutdowns. Do on-line motor testing at set times while running.
- Trending motor health: Log data and make graphs. Use trending motor health to spot small changes early. This is the heart of predictive maintenance motor.
- Preventative electrical tests: Plan a cycle of winding resistance, insulation resistance, phase balance, and thermal imaging at set intervals.
A solid plan can cut breakdowns by 70 to 75 percent. It can lower maintenance cost by 25 to 30 percent. It can push uptime up by 35 to 45 percent.
What standards and brands should I trust?
Follow NEMA and IEC guidance for test voltages and limits. NEMA MG 1 gives clear limits for voltage imbalance and starting rules. IEC offers motor testing guidelines that match global best practice.
For tools Fluke and AEMC make solid meters and clamps. For bearings SKF sets the bar. For motors ABB and Siemens publish strong testing and wiring notes. Use their datasheets and manuals.
Units matter. Record Volts, Amps, Hertz, Ohms, and Megohms. Write the ambient temperature. Write the test method. Keep it consistent.
When do I repair and when do I replace?
Use data and cost to guide you.
- Repair when: The stator is sound and you can fix bearings or a fan. The stator windings can be rewound at fair cost. The frame and rotor look good. The motor fits a special mounting that is hard to replace.
- Replace when: You see severe stator winding faults, cracked core, repeat inter-turn short, bad rotor bar faults, or chronic overheating. Also replace if the motor wastes energy or does not match a variable frequency drive (VFD) well.
Think about the cost of motor downtime and lead times. Plan a spare if the process is critical.
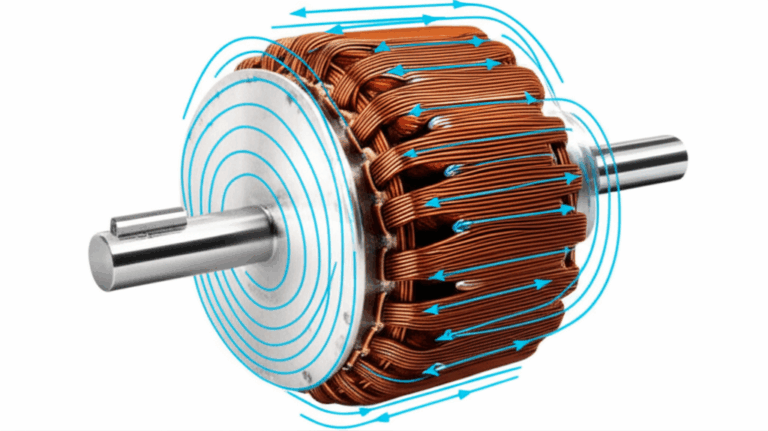
How do better laminations boost motor health and testing results?
Problem: Many motors run hot because of poor core steel and poor stacking. Agitate: Heat kills insulation and bearings. It drives up current. It trips breakers. It shows up as core loss, thermal imaging hot spots, and poor efficiency. Solution: Use quality laminations in the stator and rotor. They cut core losses and heat which makes every test look better and more stable.
- The quality of the motor core laminations shapes magnetic flux and reduces eddy losses.
- High-grade electrical steel laminations help the motor run cooler which improves insulation resistance and PI over time.
- Accurate stator core lamination stacks improve magnetic balance and cut vibration.
- Robust rotor core lamination support reduces rotor eccentricity risk.
If you build or rewind motors pick core stacks that meet your spec. This helps motor performance evaluation, motor efficiency testing, and long-term reliability improvements.
Mini case study: from downtime to uptime
A packaging line lost a motor every few months. The team only swapped parts. They never tested deeply. We ran a plan.
- Visual check found clogged fins and a cracked fan. We did a cooling fan inspection and cleaned the frame.
- Phase balance test showed 2.8 percent voltage imbalance at the MCC. We fixed a loose lug and improved the conduit connection.
- Insulation resistance test read low with a poor PI. We dried the windings and rechecked. The megohms rose and PI improved.
- Vibration analysis found misalignment and soft foot. We fixed both.
- MCSA flagged early rotor bar cracks on one unit. We scheduled a swap for a planned stop.
Results: Fewer trips. Lower heat. Less noise. The plant saved real money on downtime. They also set baseline motor data and a preventive maintenance schedule.
FAQ
Q: What is the first test I should run on a stopped motor?
A: Start with LOTO then do a visual and mechanical inspection. Next run winding resistance and insulation resistance.
Q: How often should I test a critical motor?
A: Do on-line checks monthly if you can. Do off-line checks at each planned stop. Trend voltage, current, vibration, and temperature.
Q: Will a VFD change my test plan?
A: Yes. Check VFD compatibility. Measure power quality. Use proper filters and motor protection relays. VFDs can raise shaft currents and bearing stress so plan shaft current testing.
Q: What if the motor buzzes and runs hot at light load?
A: Check voltage imbalance, single phasing, and magnetic balance. Use thermal imaging and a clamp meter. Look for loose terminals in the terminal box.
Q: Should I use a growler test?
A: Use a growler for DC armatures. For AC induction motors use surge comparison test and MCSA instead.
Key takeaways
- Always start with LOTO and PPE.
- Run simple tests first. Visual inspection, winding resistance, insulation resistance, and phase balance catch most issues.
- Add MCSA, vibration analysis, thermal imaging, and surge testing to spot early faults.
- Keep baseline data. Trend it. Act on small changes before they grow.
- Follow NEMA and IEC. Use good tools and good notes.
- Fix root causes like voltage imbalance, misalignment, lubrication issues, and poor cooling.
- Choose quality core laminations to cut heat and improve life.
- Know when to repair and when to replace.
References
- NEMA MG 1-2016, Motors and Generators. Voltage imbalance guidance and performance limits.
- IEEE Electrical Insulation Magazine. Articles on insulation aging and failure modes.
- U.S. Department of Energy. Predictive maintenance program benefits and case studies.
- Electric Power Research Institute (EPRI). Studies on motor failure rates and diagnostics.
- ALL-TEST Pro. Motor Current Signature Analysis case studies and application notes.
- Aberdeen Group. Downtime cost benchmarks in manufacturing.
- SKF. Bearing failure analysis handbooks and vibration reference charts.
Extra notes for thorough testing
To make your program complete consider these items that often hide in the shadows:
- Check for single phasing detection if a fuse blows or a contact fails.
- Verify residual magnetism effects during some tests.
- Use power quality analysis when lights flicker or drives trip.
- Consider synchronous motor diagnostics for synchronous machines.
- Make sure variable frequency drive (VFD) settings match the motor nameplate.
- Review motor control center (MCC) wiring for loose lugs and burns.
- If needed use repair shop motor testing for rewind and field motor testing for on-site checks.
- Look at off-line versus on-line test timing based on risk.
- Build a diagnostic flow chart your team can follow at 2 a.m.
Quick test and tool cheat sheet
| Item | Tool | What it finds |
|---|---|---|
| Winding resistance | DLRO or 4-wire ohmmeter | Open circuits, short circuits, resistance balance |
| Insulation resistance | Megohmmeter | Insulation resistance to ground, PI, DAR |
| Continuity | Multimeter | Open circuit detection |
| Phase balance | Multimeter and clamp meter | Voltage imbalance, current imbalance |
| Phase rotation | Rotation meter | Correct rotation |
| Thermal imaging | IR camera | Hot spots, overheating, loose lugs |
| Vibration | Vibration analyzer | Bearing failure, unbalance, misalignment, looseness |
| MCSA | MCSA analyzer | Rotor bar faults, early bearing issues |
| Surge test | Surge tester | Inter-turn short, weak insulation |
| Hipot | Hipot tester | High potential stress test |
| Power quality | Analyzer | Harmonics, sags, swells |
Final PAS wrap-up
- Problem: Motors fail from electrical and mechanical causes. Ground fault, inter-turn short, bearing failure, and phase imbalance eat your time and money.
- Agitate: Downtime costs soar. Heat rises. Insulation breaks down. You replace parts without fixing the root cause. The same motor trips again next week.
- Solution: Use this guide. Test with purpose. Follow NEMA and IEC. Trend data. Fix the root. Upgrade the core with better laminations where you can. Your motors will run cooler, longer, and safer.
By the way if you want to learn more about cores and stacks visit a trusted source for engineered laminations and core solutions. Strong cores reduce core loss and make your motor diagnostics easier because temperatures stay stable and the magnetic circuit behaves like it should.