What Is a Motor Capacitor? A Hands-On Guide to Purpose, Types, and How They Keep Motors Running
Table of contents
- Introduction: The small can that starts big things
- What exactly is a motor capacitor?
- Why single-phase motors need capacitors
- Overcoming inertia and boosting starting torque
- Improving running efficiency and power factor
- Types of motor capacitors
- Start capacitors
- Run capacitors
- Dual run capacitors
- Where you’ll find motor capacitors in the real world
- How to read a motor capacitor (ratings and markings)
- Microfarads (µF)
- Voltage rating (VAC)
- Tolerance and temperature
- Physical clues and terminals
- Common symptoms of a bad motor capacitor
- How I test a motor capacitor safely
- Safety first
- Tools I use
- Step-by-step testing
- Interpreting results
- Replacing a motor capacitor: my step-by-step process
- When I call a pro and when I DIY
- Choosing the right replacement
- Wiring tips that save headaches
- Power-up and test
- How to extend a motor capacitor’s lifespan
- Real numbers that set expectations
- Quick answers to common questions
- Conclusion: A small part with an outsized job
Introduction: The small can that starts big things
The first time I met a “motor capacitor” it introduced itself with a hum. My home’s AC wouldn’t start on the hottest day of the year. The outdoor unit sat there buzzing like a bee that forgot how to fly. I removed the panel and saw it. A shiny metal can with a bulging top and three terminals labeled C, FAN, and HERM. I replaced that dual run capacitor with a matched value and the compressor kicked on like nothing ever happened.
Since then I’ve worked on HVAC systems, well pumps, washing machines, and garage door openers that all relied on the same unassuming part. If your motor hums, runs hot, or refuses to start, the capacitor often takes the blame. In this guide I’ll explain what a motor capacitor is, why electric motors need them, how start and run capacitors differ, how to test and replace them safely, and how to pick the right one. I’ll share what’s worked for me and where you should slow down and call a pro.
If you want a deeper dive into the fundamentals behind motors, this overview of the motor principle and this primer on the stator and rotor will help connect the dots.
What exactly is a motor capacitor?
A capacitor is an electrical component that stores energy in an electric field. Think of it like a tiny rechargeable bucket for charge. It fills quickly and it empties quickly. Unlike a battery that stores chemical energy for hours, a capacitor charges and discharges in fractions of a second.
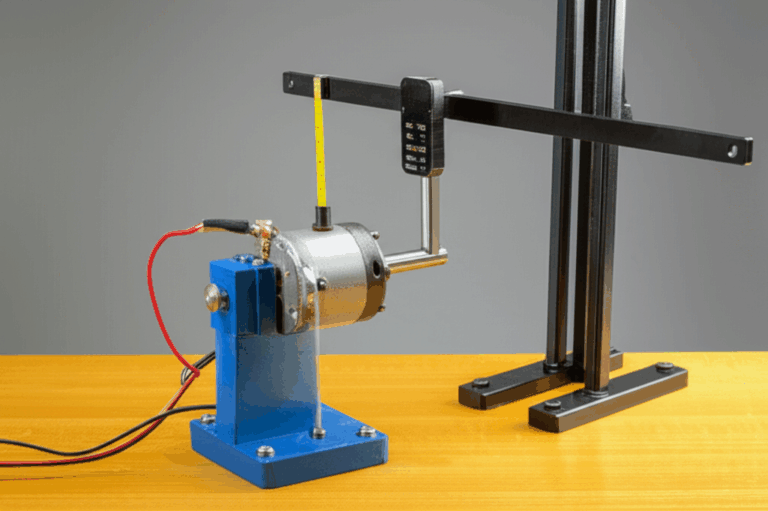
In motors we use capacitors to shift the phase of current in an auxiliary or “start” winding. That phase shift creates a rotating magnetic field in a single-phase motor. Without it the motor just sits and hums because the magnetic field doesn’t rotate on its own. The capacitor gives the motor a kick-start and in some designs it keeps the motor running smoothly and efficiently.
So when someone asks “what is a motor capacitor” my simple answer is this. It’s a small energy storage device that creates a phase shift to boost starting torque and improve running efficiency in many AC motors.
Why single-phase motors need capacitors
Overcoming inertia and boosting starting torque
Single-phase AC power alternates back and forth. That’s great for lots of things yet it doesn’t create a naturally rotating magnetic field in a basic induction motor. The field just vibrates. The rotor feels a shove in two directions at once so it sits and hums.
A capacitor fixes that by feeding the auxiliary winding a current that leads the main winding. That lead is the “phase shift.” Two windings with a phase difference behave like two phases. Now you get a real rotating magnetic field. The rotor catches the moving field and the motor starts turning with real torque. It’s the same idea as spinning a lazy ceiling fan blade with your hand so it can get going.
I’ve seen this in action on well pumps and air compressors where the load at startup is heavy. The right start capacitor makes the difference between a clean start and a motor that growls then trips a breaker.
Improving running efficiency and power factor
Some motors keep a capacitor in the circuit while running. We call these Permanent Split Capacitor (PSC) motors or capacitor-run motors. The run capacitor maintains a modest phase shift for continuous operation. That improves power factor, reduces wasted power, smooths out torque, and lowers heat in the windings. If you care about reliability, that lower heat matters.
I’ve replaced weak run capacitors in HVAC blower motors that ran too hot and drew more current than normal. Swap in the correct film capacitor with the right microfarads and voltage rating and the motor calms down. You can hear the difference. You can measure it too.
If you want to visualize how the rotating magnetic field grabs the rotor, a quick look at stator core lamination and rotor core lamination will show why core quality and design affect losses and efficiency.
Types of motor capacitors
Motor capacitors come in three common flavors. I keep examples of each on my bench because they behave differently and they fail differently.
Start capacitors
- Purpose: Deliver a strong kick of starting torque for a few seconds.
- Characteristics: High microfarad (µF) values. Often in the 70–300 µF range for small appliances. Intermittent duty only. Typically electrolytic with a plastic or black metal case.
- How they connect: In series with the start winding through a centrifugal switch or a potential relay. They drop out after the motor reaches speed.
- Where I see them: Well pumps, air compressors, some washing machines, older AC compressors that use a start-assist kit.
Start capacitors tolerate short bursts. They do not like continuous duty. If a relay sticks or a centrifugal switch fails, the start cap can overheat and vent or even pop. I’ve opened plenty that smelled like burnt electrolyte.
Run capacitors
- Purpose: Maintain a steady phase shift during normal running. Improve efficiency and reduce heat.
- Characteristics: Lower µF values. Often 2–80 µF depending on motor size. Continuous duty. Polypropylene film construction in an oil-filled or dry can.
- How they connect: Permanently in series with the auxiliary winding in PSC motors.
- Where I see them: HVAC blower motors, condenser fan motors, many refrigerator compressors, and other PSC applications.
Run capacitors fail more quietly. Capacitance slowly drifts down. ESR (equivalent series resistance) creeps up. The motor starts to run hot and lose torque. You’ll sometimes see a slight bulge or a tiny oil weep on oil-filled cans.
Dual run capacitors
- Purpose: Combine two run capacitors into one can. Common in HVAC outdoor units to serve both the compressor and the condenser fan motor.
- Characteristics: Three terminals labeled C (Common), HERM (compressor hermetic), and FAN. Ratings like 45/5 µF at 440 VAC.
- Benefits: Fewer parts. Cleaner wiring. Easier to mount in cramped control compartments.
That AC story I opened with involved a dual run capacitor. The top bulged. The fan turned slowly. The compressor wouldn’t start. A correct 440 VAC 45/5 µF replacement fixed it in minutes.
Where you’ll find motor capacitors in the real world
If it has a single-phase AC motor, it probably has a capacitor nearby. I’ve replaced or tested caps in:
- HVAC systems: condenser fan motors, compressors, blower motors in furnaces or air handlers. Dual run caps live here.
- Refrigeration units: walk-in coolers and home fridges use run capacitors on compressors.
- Pumps: well pumps and booster pumps often use start capacitors with potential relays.
- Appliances: washing machines, dryers, and some dishwashers use start or run capacitors.
- Garage door openers and industrial fans: PSC motors are common here.
You’ll also see capacitors in phase-shifting setups like phase converters, though that’s a separate animal with different sizing rules.
How to read a motor capacitor (ratings and markings)
When I pick a replacement, I match more than the shape. I match the numbers.
Microfarads (µF)
This is the capacitance value. Start caps have high µF. Run caps have lower µF. The motor expects a specific value. Replace like-for-like unless the manufacturer specifies a range. For dual run caps you’ll see two values like 40/5 µF. One value serves the compressor. The other serves the fan.
A run capacitor listed at 10 µF ±6% should measure between 9.4 and 10.6 µF. If it falls outside that window, it’s out of spec.
Voltage rating (VAC)
This is the maximum continuous voltage the capacitor can handle. Common ratings include 250 VAC, 370 VAC, and 440 VAC. You can always go equal or higher. Never go lower. If the old cap is 370 VAC, a 440 VAC replacement is fine and often preferred in harsh environments because it tolerates spikes better.
Tolerance and temperature
Run capacitors often list tolerance like ±5% or ±6%. Tighter tolerance usually means better performance. You may also see temperature ratings like 70°C or 85°C. Higher temperature ratings usually mean longer life in hot compartments.
Physical clues and terminals
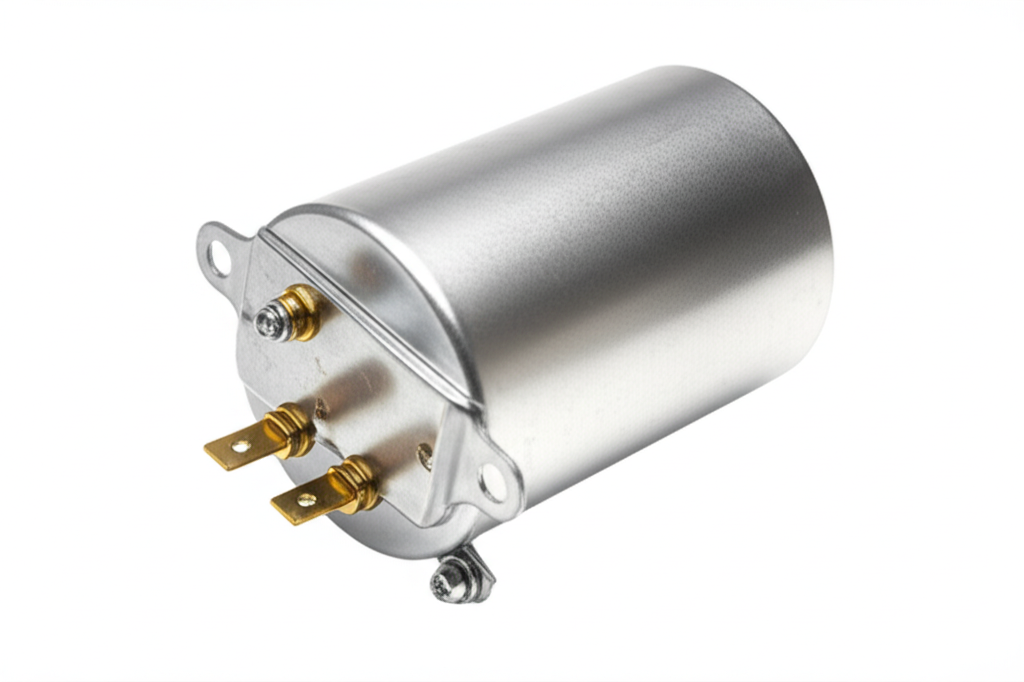
- Can style: Round or oval aluminum cans are common for run and dual run caps. Plastic cases are common for start caps.
- Terminals: Spade terminals marked C, HERM, FAN on dual caps. Single-value run caps often have two unlabeled clusters that are electrically common pairs.
- Certifications: Look for UL or CSA markings and safety approvals. That’s not window dressing. It means the part met basic safety standards.
I keep a small chart in my notes with the original motor’s µF and voltage ratings. It saves guesswork when the label on an old cap has faded or leaked.
Common symptoms of a bad motor capacitor
Over time I’ve learned to spot the red flags quickly. These symptoms show up again and again:
- Motor hums but won’t start. Classic failed start capacitor. If you spin the fan blade with a stick and it starts running, that points to the cap.
- Motor starts slowly or struggles to reach speed. Weak start capacitor or a start relay problem.
- Motor runs hot or overheats. Weakened run capacitor raises current and heat. Thermal overloads trip more often.
- Breaker trips or fuses blow when the motor tries to start. Bad start assist or a shorted capacitor can do that.
- Visible damage: Bulging top, split seam, leaking oil, melted casing, or a burned smell.
- High energy bills or noisy operation on HVAC systems. A degraded run capacitor can waste power and make the motor work harder.
A quick visual inspection often pays off. I never put power back on a motor if the capacitor looks swollen or leaky.
How I test a motor capacitor safely
Safety first
Capacitors can store a dangerous charge even after power is off. A 440 VAC capacitor deserves respect. I always:
- Shut off the breaker and lock it out if possible.
- Verify power is off with a meter.
- Discharge the capacitor before touching terminals.
To discharge, I prefer a 2 kΩ to 10 kΩ, 5 W resistor with insulated leads. I hold it with insulated pliers and bridge the capacitor terminals for several seconds. I then move it to each terminal combination on a dual cap. Many people use an insulated screwdriver to short terminals. I’ve done it in a pinch though I treat that as a last resort because it can spark and pit the terminals.
Tools I use
- Digital multimeter with a capacitance setting (capacitance meter works too).
- For ESR, a dedicated ESR meter helps on run caps though not everyone has one.
- Insulated screwdriver and needle-nose pliers for removing spade connectors.
- Marker or smartphone for labeling and photos.
Step-by-step testing
- On a single-value cap, touch the probes to the two terminals. Read µF.
- On a dual cap, measure C to HERM for the compressor value. Then measure C to FAN for the fan value.
Interpreting results
- Within tolerance: The capacitor is likely okay.
- Low reading: It’s weak. Replace it.
- Open circuit or “OL”: The capacitor is open. Replace it.
- Zero or near zero ohms: Shorted. Replace it now.
- High ESR on a run cap: Replace it. The motor will run cooler and draw less current with a healthy cap.
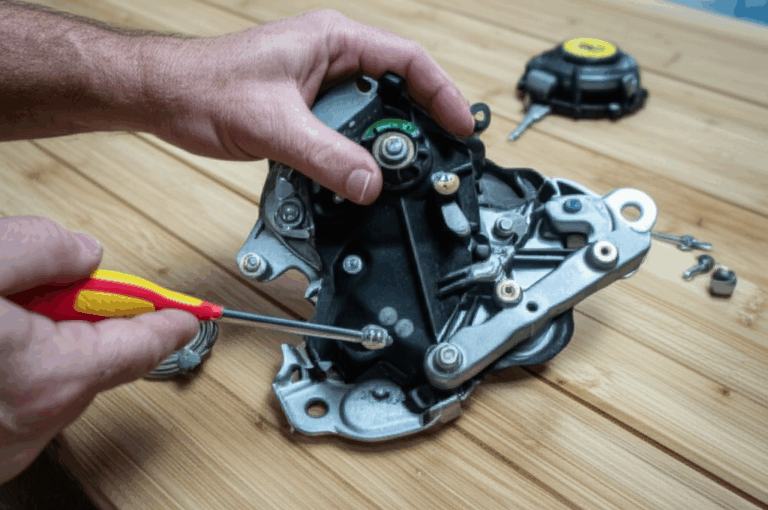
Replacing a motor capacitor: my step-by-step process
When I call a pro and when I DIY
If I’m dealing with a simple HVAC fan motor or a known dual run capacitor with easy access, I’ll handle it. If the motor uses a start capacitor with a potential relay, or if the unit has tricky access, or if the motor stalls after a new capacitor, I call an HVAC technician. Licensed pros know how to check windings, relays, and switches under real load. They also follow local electrical codes like NFPA 70/NEC.
Choosing the right replacement
- Match the microfarads. Use the exact µF specified. For dual caps, match both values like 40/5 µF.
- Voltage rating equal or higher. If the original is 370 VAC, a 440 VAC replacement is fine. Never go lower.
- Physical size and mounting. Make sure it fits the clamp or bracket. Oval vs round matters in tight panels.
- Duty type. Start caps are intermittent duty and usually electrolytic. Run caps are continuous duty and usually polypropylene film. Don’t cross those streams.
- Certifications. UL and CSA listings give me peace of mind.
- Temperature rating. Higher is better for hot compartments.
Wiring tips that save headaches
- Take a clear photo before removing wires. Then label them. On a dual run cap, C goes to common. HERM goes to the compressor. FAN goes to the fan motor.
- Replace corroded or loose female spade connectors. Loose connections create heat. Heat kills capacitors.
- Keep leads tidy and away from sharp sheet metal. Tie them down if needed.
- On start capacitor setups with a centrifugal switch or potential relay, check the switch or relay if the new capacitor still doesn’t start the motor. A stuck relay can cook a new start cap in minutes.
Power-up and test
I restore power and listen with the panel still open. I want to hear a clean start and steady running. I measure current draw if I can. If the compressor starts smoothly and the condenser fan spins at normal speed, I button up the panel. I write the install date on the capacitor. It helps with future troubleshooting.
How to extend a motor capacitor’s lifespan
I can’t make a capacitor immortal. I can give it a better life.
- Keep it cool. Heat is the enemy. Make sure cabinets breathe. Clear dust from blower compartments. Heat shortens life exponentially.
- Fix voltage problems. Spikes and sags beat up capacitors. If you see repeated power quality issues, talk to an electrician.
- Avoid overloading the motor. A motor that labors constantly runs hot. Hot motors bake their capacitors.
- Replace weak parts in the chain. A failing fan motor draws too much current then roasts the run cap. A stuck start relay does the same to a start cap.
- Use quality replacements. Cheap no-name capacitors save a few dollars now then fail early. OEM or reputable aftermarket brands usually last longer.
- Inspect annually in harsh environments. Look for bulging, oil leaks, or corroded terminals.
For deeper context on how the motor’s magnetic path affects heat and losses, it helps to know that manufacturers invest heavily in motor principle fundamentals and in the quality of core laminations. Better laminations reduce core losses which means cooler motors and happier capacitors over time.
Real numbers that set expectations
I like expectations grounded in reality. Here’s what I’ve seen and what industry data often shows.
- Failure rates: A notable chunk of HVAC service calls trace back to faulty capacitors. Many reports put it around one-fifth to one-third of failures. That lines up with my service logs.
- Start capacitor lifespan: They’re intermittent duty. Expect something like 10,000 to 100,000 starts depending on design and environment. In homes they often last 5–10 years.
- Run capacitor lifespan: Many run 20,000 to 60,000 hours under normal conditions. Hot compartments and voltage stress shorten life. A 10°C rise can roughly halve life.
- Impact of failure on motors: A weak run capacitor makes the motor draw more current and run hotter. I’ve measured 5–15% efficiency loss in affected motors. Replace the cap and the numbers improve.
- Replacement cost: Common capacitors run $10–$50 for the part. A professional visit with parts and labor often lands between $100 and $350 depending on access and region. The diagnostic time is often the bigger piece of the bill.
- Energy savings: Replacing a degraded run cap rarely transforms your whole power bill. It can trim wasted watts on that motor by a few percent and it can prevent winding damage. Preventing a motor replacement is the real savings.
Quick answers to common questions
- Start vs run capacitor difference? Start caps deliver a high µF boost for a few seconds. Run caps deliver a lower µF phase shift continuously. Start caps are electrolytic and intermittent duty. Run caps are polypropylene film and continuous duty.
- Can I use a higher voltage rating? Yes. Match the µF and go equal or higher on VAC. Never lower.
- My capacitor tests good but the motor still hums. Check the start relay or centrifugal switch. Check the motor windings. Check for seized bearings or a jammed load.
- How do I know the dual run cap connections? C is common. HERM goes to the hermetically sealed compressor. FAN goes to the condenser fan motor. Don’t swap them.
- Is a bulging top always bad? Yes. Replace it. Bulging means gas built up inside from overheating.
- Do I need to discharge a capacitor before testing? Always. Treat it as live until you’ve discharged it safely with a resistor or proper tool.
- What about ESR? On run capacitors high ESR means more internal loss and heat. If ESR is high, I replace the cap even if µF still looks okay.
A closer look at how motor design and capacitors work together
Capacitors don’t operate in a vacuum. The motor’s magnetic circuit, winding design, and internal losses all play a role. Better steel and tighter stacks in the stator and rotor reduce eddy currents and hysteresis losses. That means the motor runs cooler which takes stress off the capacitor. If you’re curious how manufacturers achieve that, this overview of stator core lamination and this one on rotor core lamination show how laminations cut those losses at the source. I’ve toured facilities that stamp and stack laminations with precision because a small improvement there can ripple through motor life and reliability.
Safety and standards I pay attention to
I don’t cut corners on safety. These points guide my work.
- Capacitor discharge: I favor a resistor discharge method. I only short with a screwdriver if I have no other option and only with protective gear.
- Ratings and certifications: UL and CSA listings matter. They’re not perfect. They’re better than guesses.
- NEC/NFPA 70: I route and secure wiring to avoid abrasion. I use proper connectors. I replace brittle spades. I keep control panels clean to avoid corrosion and arcing.
- Personal protective equipment: Safety glasses, insulated tools, and one-hand rules around live panels when I must measure under power.
Case notes from the field
A few quick stories put theory into context.
- The slow-starting blower: A furnace blower kept tripping thermal overloads. The run capacitor tested 7.8 µF on a 10 µF ±6% part. That’s out of spec. I replaced it with a 10 µF 440 VAC film capacitor. The motor drew 0.4 A less and the overheating stopped.
- The stubborn well pump: The pump hummed and wouldn’t start. The start capacitor measured zero µF. Dead. I replaced the start cap and the potential relay because the relay contacts looked pitted. The pump started strong and kept running.
- The garage door hiccup: The opener strained on cold mornings. The run capacitor had drifted down to 3.0 µF from 5 µF. I swapped it for a proper 5 µF 250 VAC film cap. The door opened like new.
Each time the fix started with a safe discharge and a correct diagnosis. Guesswork wastes time and parts.
Choosing quality parts and avoiding common pitfalls
I’ve learned a few buying rules the hard way.
- Buy from reputable suppliers. Discount bins can be tempting. I’ve seen mislabeled µF and counterfeit safe-case logos.
- Avoid undersized voltage ratings. A 370 VAC cap in a 440 VAC world fails early.
- Don’t oversize the µF to “add torque.” That can overheat the auxiliary winding. Follow the nameplate or manufacturer specs.
- Match duty type. Never replace a run capacitor with a start capacitor or vice versa.
- Keep spares where they matter. I keep a few common dual run values like 35/5 µF and 45/5 µF on hand for HVAC season. I also keep individual 5, 7.5, 10, 20, and 30 µF run caps.
Troubleshooting flow that keeps me honest
When a motor misbehaves I walk this path before I touch parts.
This flow saves me from chasing ghosts. It also prevents me from blaming a capacitor for every motor problem. Not every hum is a bad cap.
Conclusion: A small part with an outsized job
Motor capacitors don’t get headlines. They look like simple cans bolted inside a panel. Yet they start heavy compressors, keep blowers humming efficiently, and protect windings from needless heat. When a motor hums or runs hot I give the capacitor a hard look first. I match µF, pick an equal or higher voltage rating, and test safely before I swap. If the fix doesn’t stick or the setup uses start relays and complex controls, I call a pro.
Treat capacitors with respect and they’ll return the favor. Your motors will start cleaner, run cooler, and last longer. That’s the quiet power of a component most folks never notice until the day it fails.